After a product and a subscriber has been created, the subscriber has to be subscribed to a subscription.
You can create subscriptions directly via the backend. For this you have to navigate to Space > Subscription.
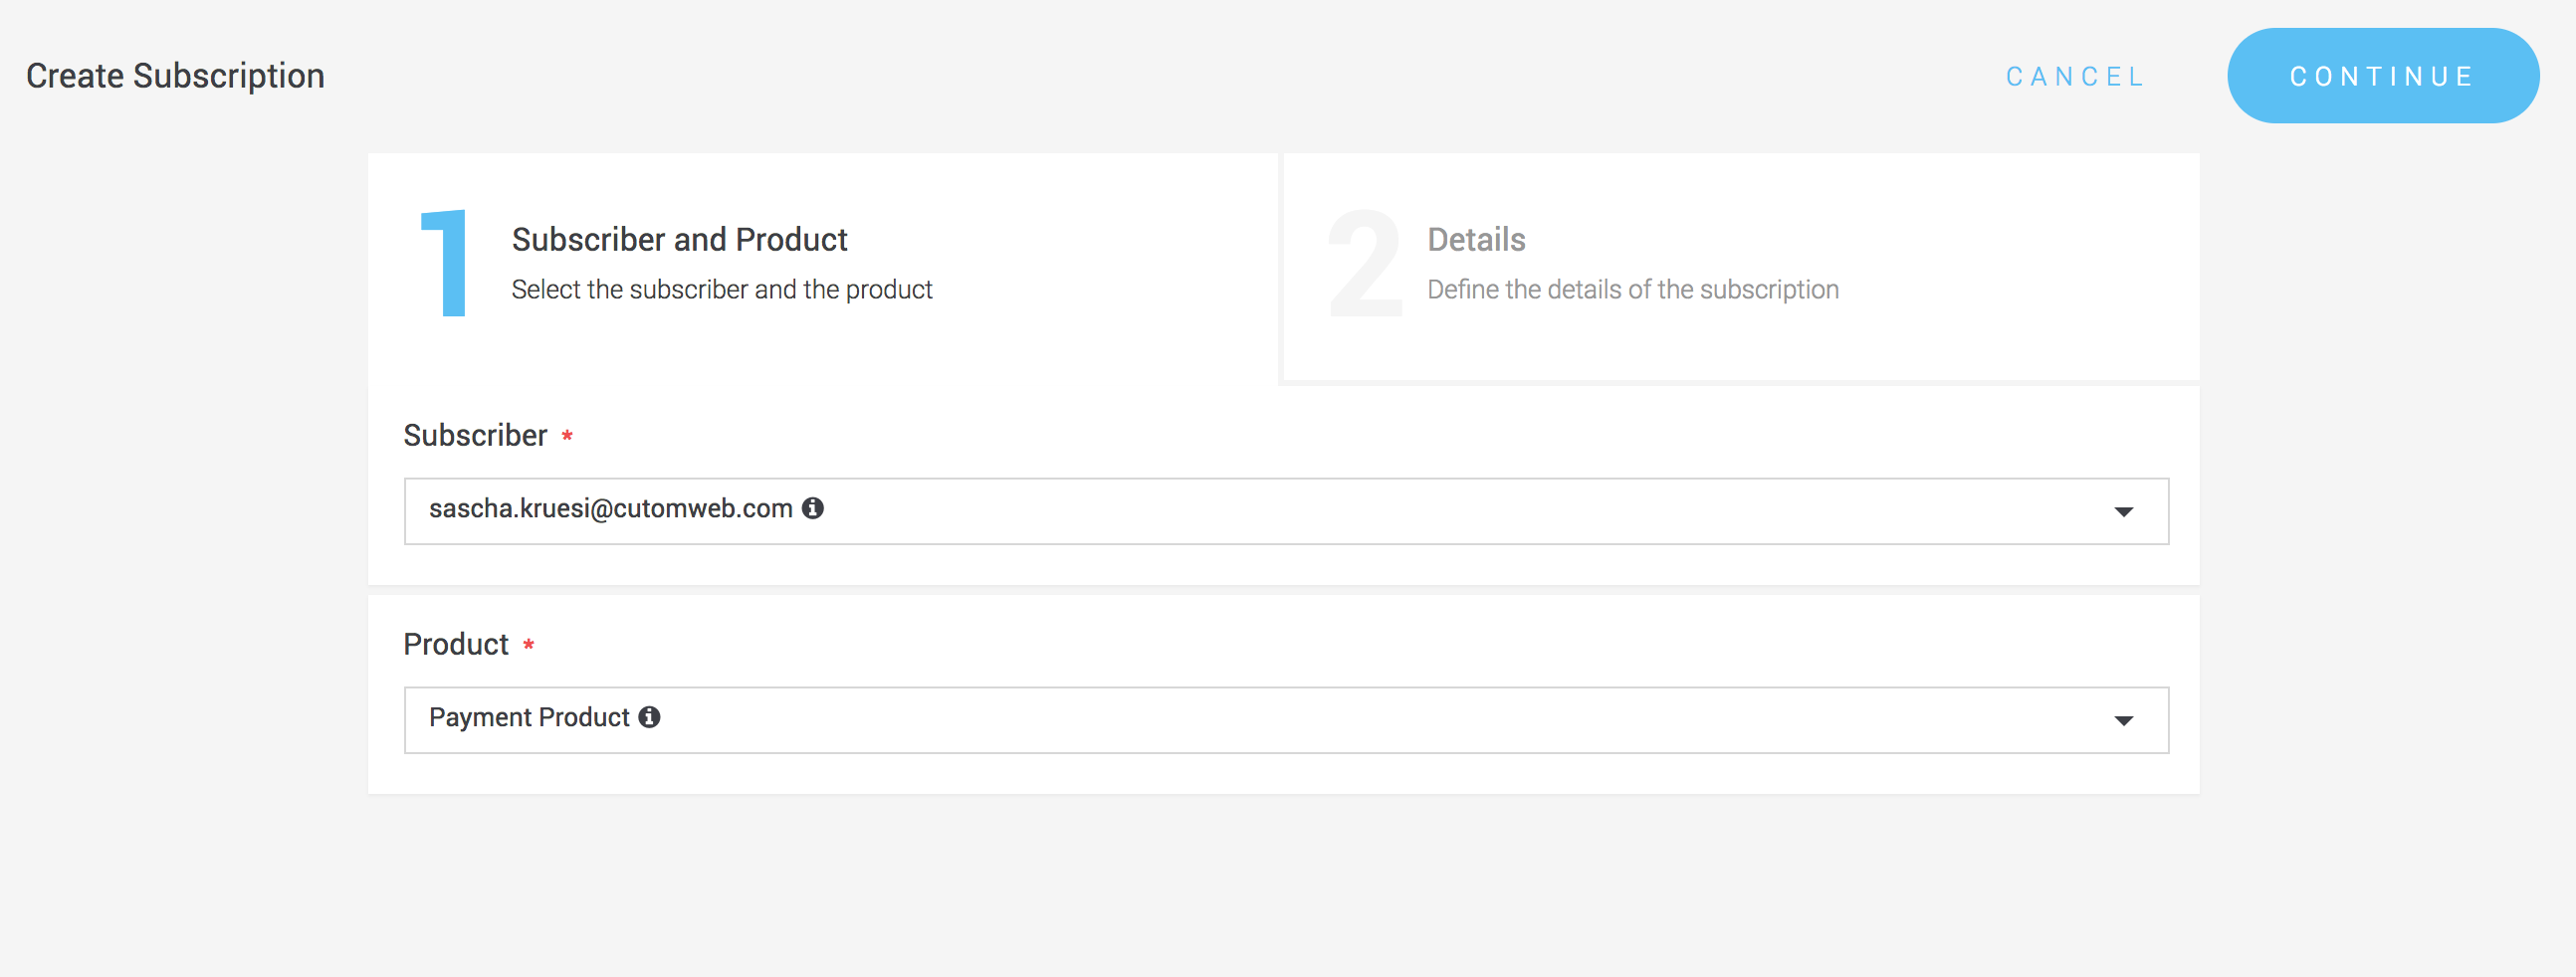
Figure 1. Select a subscriber and a product in the backend.
First, you have to select the subscriber that you want to subscribe to a product. On the subsequent page you will be presented with an additional dialog that asks for a reference and provides an overview over the monthly costs that you defined in the product.
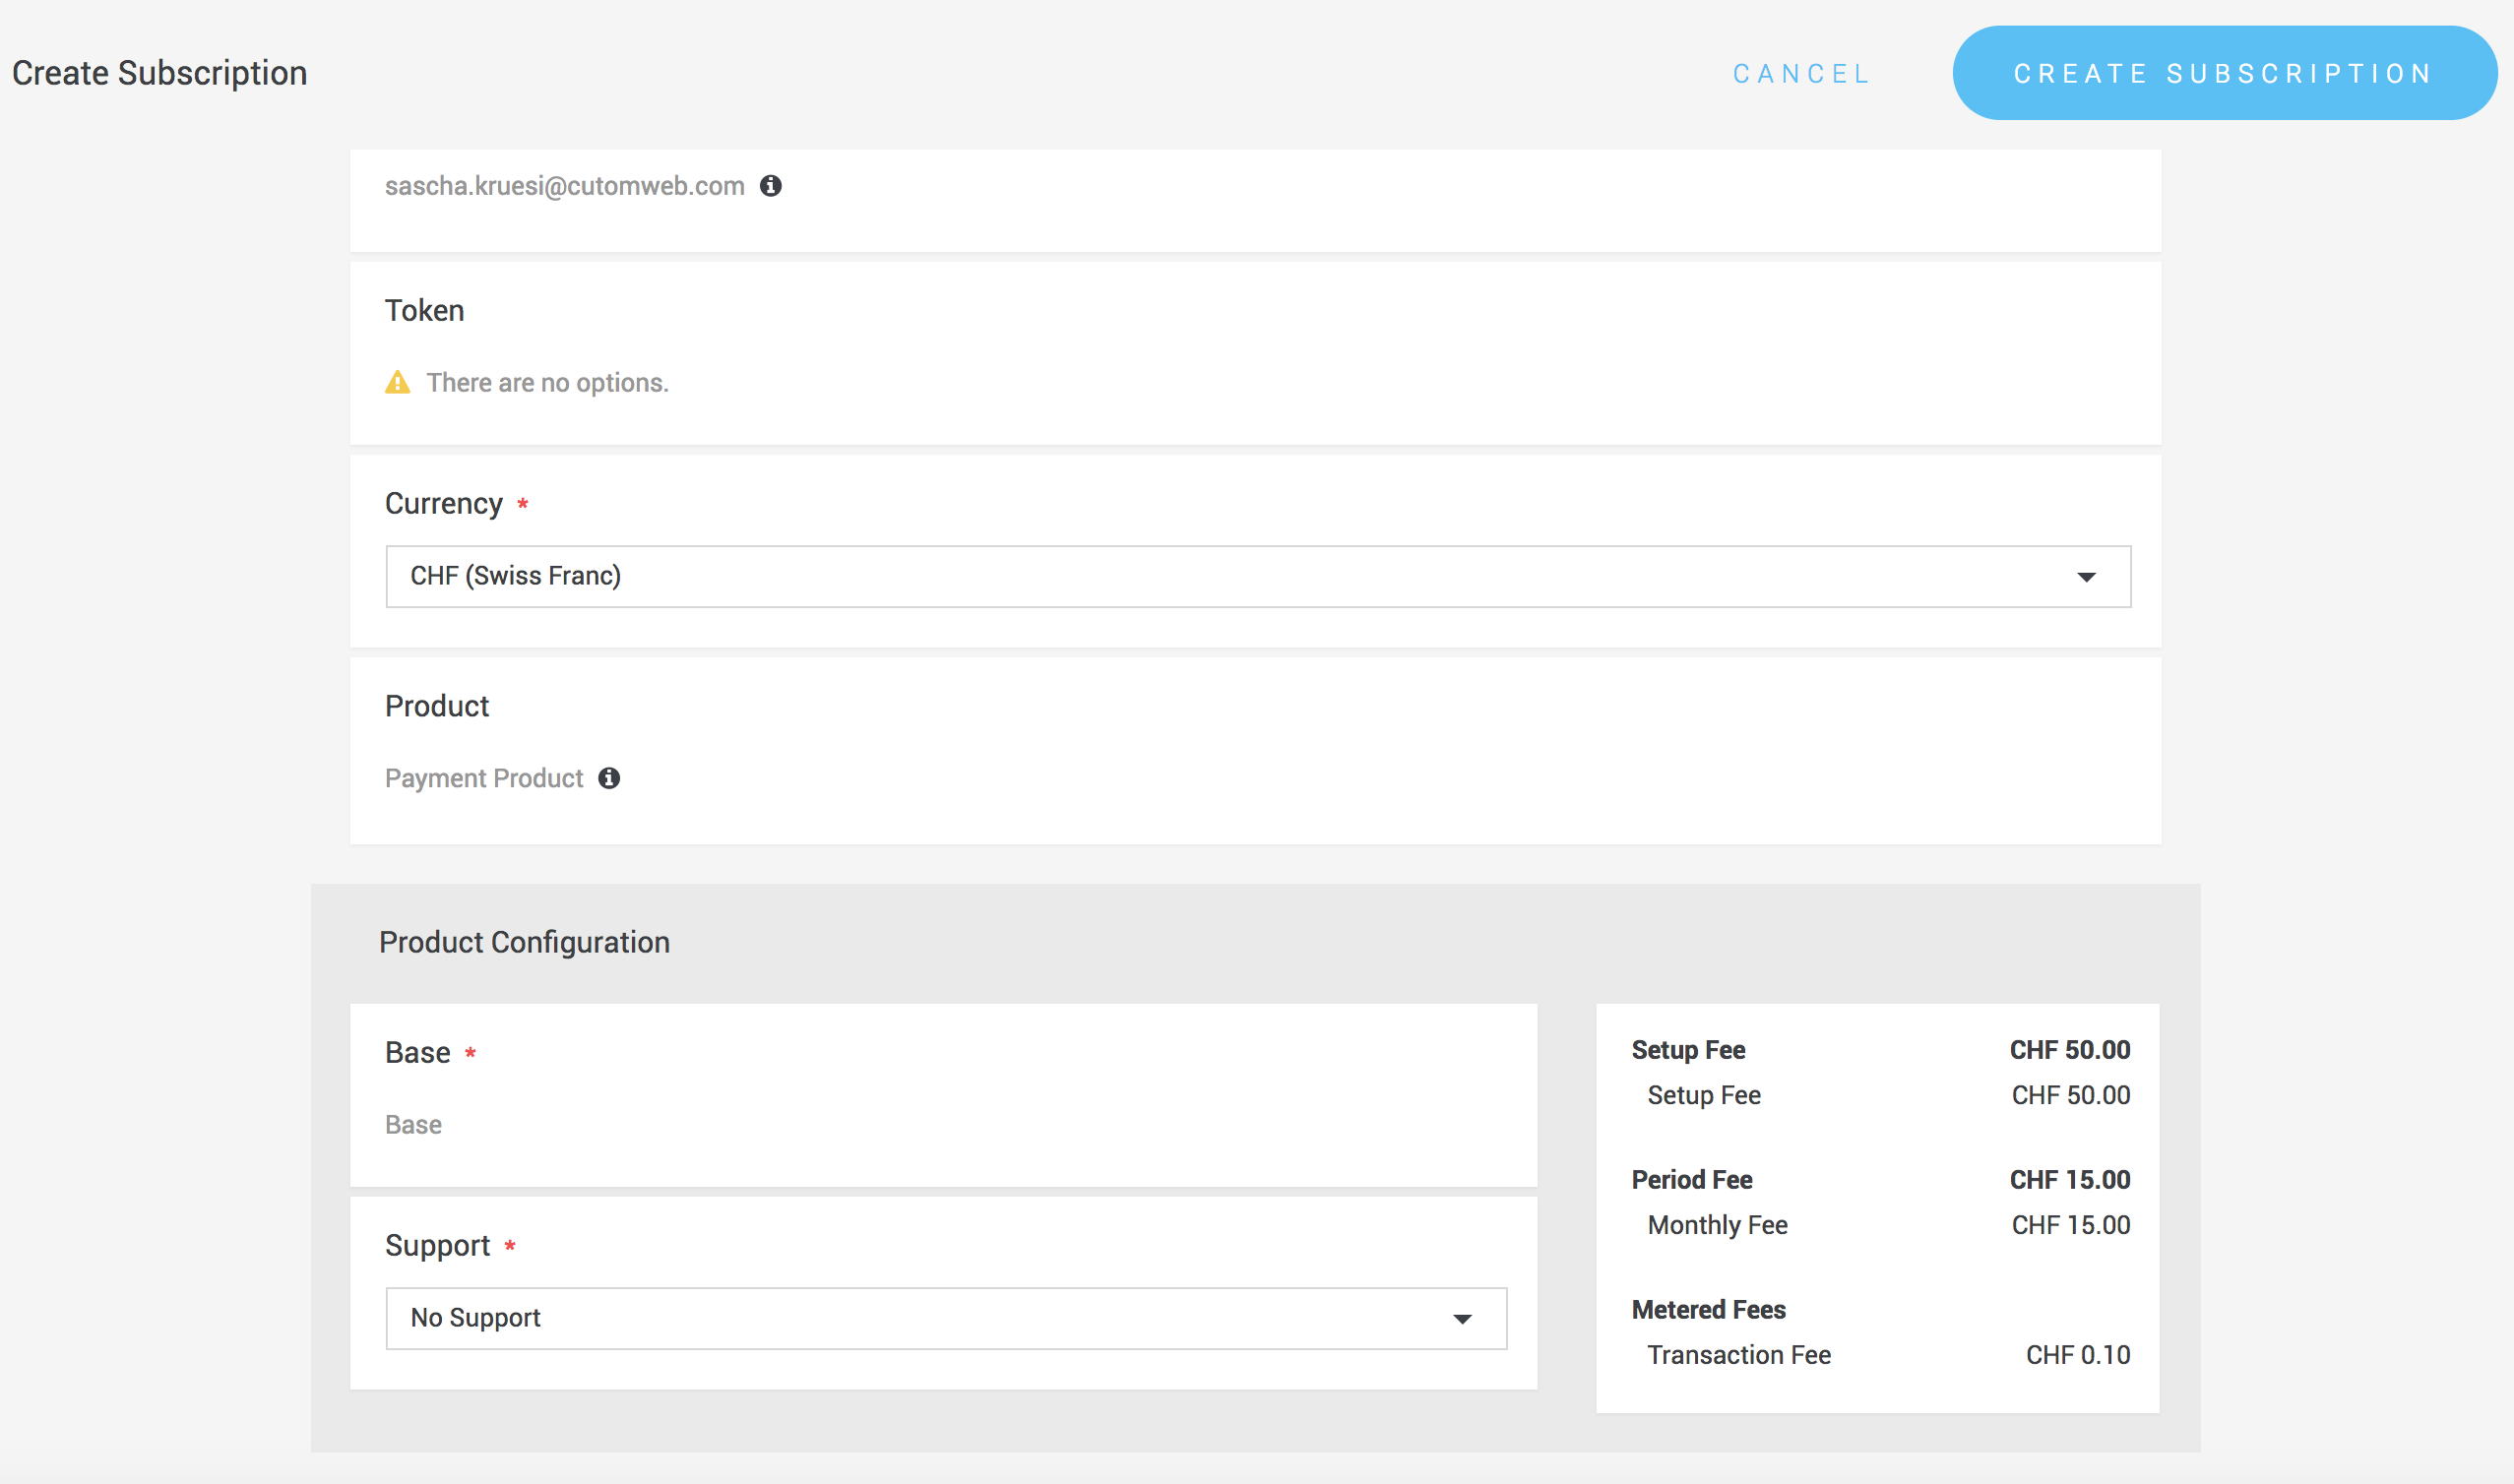
Figure 2. Configure the subscription for the subscriber.
|
Note
|
In this example no token is present and selected. This will trigger a Charge Flow where the an email will be sent to the subscriber asking for his payment details. In case you have this payment information already stored in a valid token, it is important that you select the token here. More information about token creation can be found in the tokenization documentation. |
A subscription can also be created via the web service API. there are two ways to initialize a subscription.
We have to distinguish between two different forms how subscriptions can be initialized:
-
You integrate the subscription service in your web site with a boarding process where the subscriber is present and you want to collect his payment details right away. In this case you will have to use the service
initializeSubscriberPresent. This will create aconfirmedpayment transaction that can be used to build the Payment Page URL or the Java Script as described in the Iframe Documentation respectively the Payment Page documentation. -
You can also use
Charge Flowsto initialize a subscription. In this case you use theinitializeService. More about Charge Flows in the Charge Flow Documentation
See the following sample request to find out how you have to combine the requests.
It is possible to create a subscription with a specific token. When the token is already initialized and ready to be used the creation of the subscription does not require any input from the subscriber. When you do not provide a token we create a token along the subscription. The newly created token is not initialized. As such it requires that the user provides the payment information. This can be done through the initial transaction of the subscription.
Beside let the system create the token it can be created manually and assigned to the subscription.
Tokens can be created via the backend under Space > Payment > Tokens. Click there to create a new token.
Tokens can also be created via the web service API by using the create operation on the
Token Service.
Request
{
	"enabledForOneClickPayment": true,
	"externalId": "customer-id-1",
	"tokenReference": "customer-id-1"
}|
Note
|
The externaId has to be unique. If you send the externalID again the token will be updated.
|
|
Note
|
If you update entities you have to increase the version property in order to maintain consistency. |
A subscription can also be created over the API. In order to do this you will have to use Subscription Service.
{
	"currency": "EUR",
	"product": {
		"id": 2
	},
	"selectedComponents": [{
		"id": 4
	}, {
		"id": 2
	}],
	"subscription": {
		"reference": "subscription-subscriber-101",
		"subscriber": {
			"id": 2
		},
		"token": {
			"id": 3
		}
	}
}
This will create a subscription in PENDING state with the specified product components and properties.
As next steps we have to Initialize the subscription. This can be done in two ways.
-
Generally you have the subscriber present in your application and you want him to provide the payment details directly in the boarding process. In this case you use the
initializeSubscriberPresentOperation on the Subscription Service -
In case your subscriber is not present you can also send him a payment link via the Charge Flow where he will be asked to provide his payment information. In this case you use the
initializeoperation on the Subscription Service
Once the subscription is created we can initialize the transaction with the initializeSubscriberPresent Operation on the
Subscription Service.
Request
POST request to the following endpoint:

/api/v2.0/subscriptions/2/initialize-subscriber-present
{
	"successUrl": "http://www.yoursuccessurl.com",
	"failureUrl": "http://www.yourfailedurl.com"
}
Response
{
	"createdOn": "2017-04-26T12:08:37.602Z",
	"discardedBy": 0,
	"externalId": "subscription-2",
	"failedUrl": "http://www.yourfailedurl.com",
	"id": 2,
	"ledgerEntries": [],
	"linkedSpaceId": 1,
	"plannedExecutionDate": "2017-04-26T12:08:37.152Z",
	"plannedPurgeDate": "2017-05-12T12:08:37.333Z",
	"processingType": "SYNCHRONOUS",
	"state": "PROCESSING",
	"subscription": {
		"id": 2
	},
	"succeedOn": null,
	"successUrl": "http://www.yoursuccessurl.com",
	"transaction": {
	  "id": 2
	},
	"type": "AUTOMATIC",
	"version": 1
}
This will create a payment transaction that is in the state confirmed. The transaction id that is returned in the
response can now be used to either buildJavaScriptUrl or buildPaymentPageUrl and create an
IFrame or Payment Page authorization.
Example
In the example we use the GET Request to buildPaymentPageURL to get the URL where you redirect your merchant to provide the payment information
and complete the initialization of the subscription. When the transaction is in the state fulfill the subscription will switch into the
state Active. This will also create an active subscription version.
You can also initialize a subscription with a Charge Flow. In this case you use the initialize operation on the
Subscription Service.
This will automatically trigger a Charge Flow and request the payment information from your subscriber in case you did not provide a token or the token is not valid.
|
Note
|
You now have a subscriber subscribed to a product! Behind the scenes, we create a ledger where we keep track of the charges that occur during a period. Every period the ledger will be reconciled and the outstanding amount will be charged to the customer. This will create a transaction and an associated invoice. The invoice outlines what the customer owes, reflects when they will be or were charged, and tracks the payment status. You can add additional items charges on this ledger via the API or in the backend. More information can be found in the billing section. |
Subscriptions can be terminated with the terminate operation in the Subscription Service.
You have the option to respect the termination period or to terminate the subscription immediately.
When the termination period is respected the subscription will run the specified number of termination periods on the product version
until the subscription finally terminates. When you choose to terminate the subscription immediately the subscription will be stopped and
the period fee will be calculated pro rata and a charge with the outstanding amount will be triggered.
If you terminate a subscription the subscription will be moved
into the terminating state where the outstanding amounts will be charged. Once the last charge is successfully completed we move the
subscription into the terminated state.
Request
spaceId=1&subscriptionId=2&respectTerminationPeriod=trueTypically a subscription changes over time. There are multiple reasons for a change. Either the user wants a different
plan (e.g. switch from the basic plan to the pro plan) or the product itself changes. A product change may require
that the subscription is updated to the latest product version.
A change can be applied immediately or as per the termination period. When an immediate change is issued the current running period is terminated and the outstanding amounts are charged. Period fees are calculated pro rata in this case. Setup fees are treated specially see Upgrading & Downgrading.
A change can be applied either via the API or over the backend.
Subscriptions can be changed via the backend by editing the subscriptions. You can select the new product and define if the termination period should be considered. This leads to the creation of a new subscription version for the subscriber that will be active depending on the termination setting.
You can also initiate a subscription change via the web service API by using the applyChanges operation on the
Subscription Service
The request below will update my subscription with ID 8 to the new pro product with ID 3. This changes will take effect immediately.
Request
{
	"currency": "CHF",
	"product": {
		"id": 3
	},
	"respectTerminationPeriod": false,
	"selectedComponents": [{
		"id": 14
	}],
	"subscription": {
		"id": 8
	}
}Setup fees locking the subscriber. However, the locking between switching products should be reduced. Therefore
typically the setup fees get reimbursed when switching between products. For example when switching from the basic plan to the
pro plan the subscriber does not need to pay the full setup fees of the pro plan again. There is a discount granted. We
call this process of switching between products with setup fees upgrading resp. downgrading. An update of the product version
may also lead to an upgrade or downgrade.
The following sections are only relevant when the product has setup fees.
The illustration below helps to show how downgrades and upgrades are calculated.

Figure 3. How are upgrades or downgrades calculated.
If you are performing an upgrade or a downgrade is determined by two parameters:
-
weight: The weight can be set on the product component.
-
product-reference: The product reference is also set on the product component.
In case you change a subscription we compare the components of the old and the new product version.
-
Initially the setup fee of the new product version will be charged to the subscriber. In the illustration above you see that the new product version has a setup fee of 150 EUR for the Support Pro Component. So this will be charged immediately after the change is carried out.
-
Based on the weight and the settings on the component in the old product version, there will be an upgrade or downgrade credit to his ledger. In the illustration above we set on the component Support that there will be a 50 EUR credit in case of an upgrade.
-
First of all we check if the component was already present in the old product version in the same component group. If we find the reference we compare the weights to determine if it is in upgrade or downgrade.
-
As the weight of the component Support Pro is higher the change is considered as upgrade and the 50 EUR will be credited to the ledger of the subscriber.
-
In case a new component is added to the component group that was not present in the old product version no credit will be carried out.
The change in the subscription version of the subscriber results in a credit that can be seen on the subscription ledger of the subscriber.
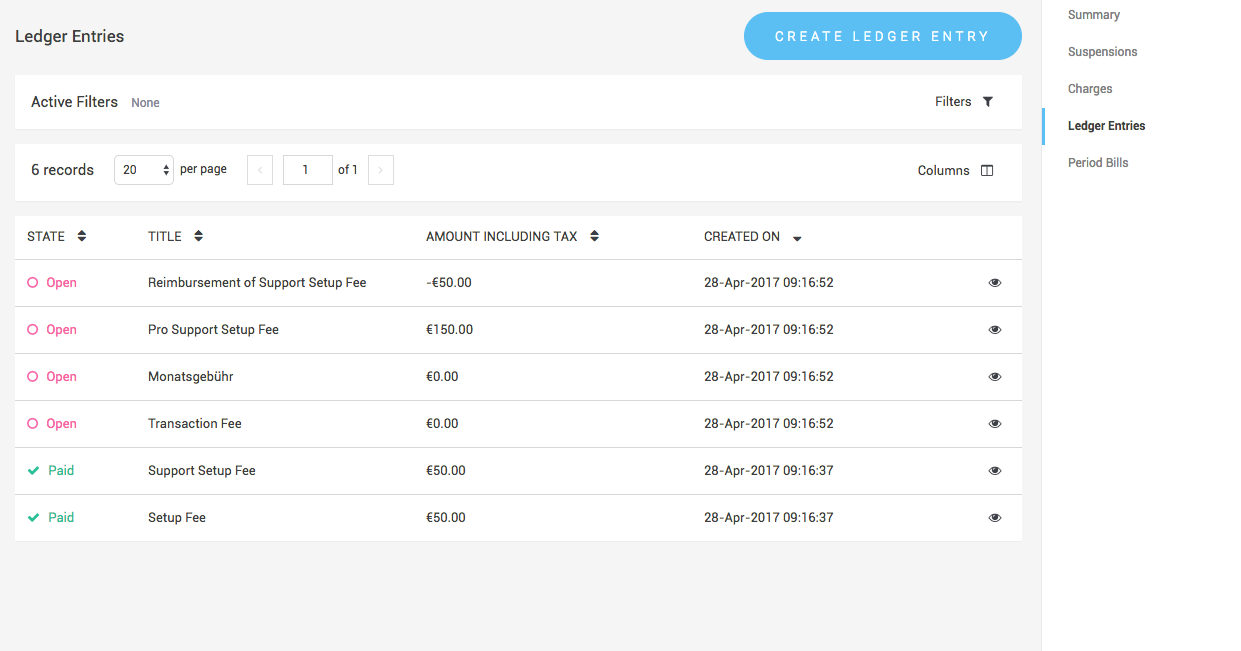
Figure 4. See the 50 EUR that is credited to the ledger of the subscriber.