Die Registrierungsdokumentation erklärt Ihnen kurz, wie Sie Ihr eigenes Sage Pay-Vendor-Konto erhalten. Dies ist eine Voraussetzung, um mit der Abwicklung von Transaktionen zu beginnen.
Bevor Sie mit der Zahlungsannahme über den Sage Pay-Zahlungsprozessor beginnen können, benötigen Sie ein SagePay- Konto. Sie erhalten dieses Konto unter der folgenden URL: https://applications.sagepay.com/apply.
Sobald Sie das Sage Pay-Konto erstellt haben, erhalten Sie ein Test- und ein Live-Konto. Sie erhalten die folgenden Details:
-
Sage Pay Vendor Name
-
Sage Pay Benutzername
-
Passwort
Diese Informationen sind erforderlich, um sich im Administrations-Backend namens MySagePay anzumelden. Nachfolgend finden Sie die URL zur Test- und Live-Umgebung.
-
Testumgebung: https://testportal.sagepay.com/mysagepay/login.msp
-
Live-Umgebung: https://portal.sagepay.com/mysagepay/login.msp
Über das Administrationskonto können Sie die Transaktionen einsehen, Benutzerkonten erstellen und weitere administrative Vorgänge durchführen.
Sobald Sie den Antrag gestellt haben, erhalten Sie ein Testkonto. Wenn Sie die Connector-Konfigurationen erstellt und eine Testtransaktion erstellt haben, können Sie bei SagePay ein Live-Konto beantragen. SagePay führt eine Reihe von Einrichtungstests mit Ihnen durch. Sobald diese abgeschlossen sind, wird Ihr Konto für die Live-Nutzung aktiviert.
Stellen Sie sicher, dass Sie auch in den Live-Modus wechseln, indem Sie die Prozessorkonfiguration öffnen (Space > Zahlung > Konfiguration > Verarbeiter) und den Betriebsmodus auf Live setzen.
Die folgende Dokumentation führt Sie durch die notwendigen Schritte zur Einrichtung der Sage Pay-Prozessor- und Connector-Konfiguration.
Zunächst müssen Sie ein Benutzerkonto erstellen, um uns den Zugang zu gewähren, unsere IP-Adressen auf die Whitelist zu setzen oder die Zugangsdaten zu verwenden, um die 3rd-Man-Ergebnisse abzurufen.
Gehen Sie wie folgt vor, um einen Benutzer für Ihre Konfiguration zu erstellen:
-
Melden Sie sich im MySagePay-Backend an
-
Klicken Sie auf Users
-
Klicken Sie auf Create New User und füllen Sie die Formulare aus.
-
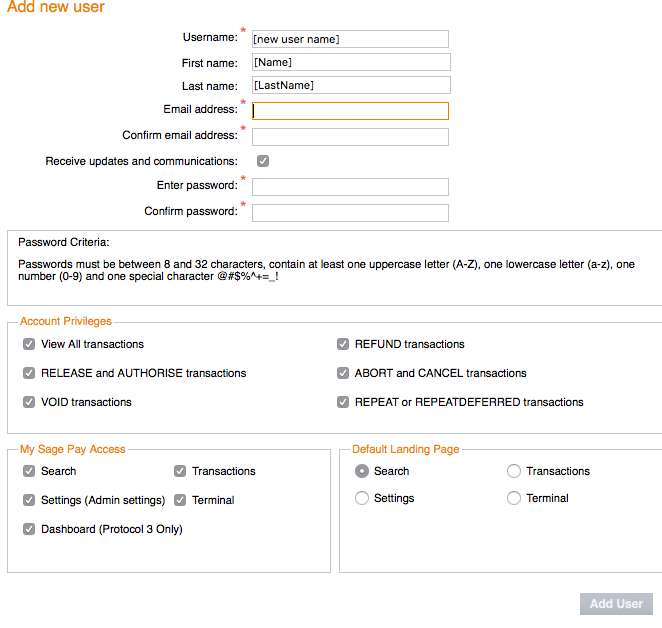
Sie müssen ausreichende Zugriffsrechte gewähren (siehe Screenshots unten)
Figure 1. Stellen Sie sicher, dass Sie beim Erstellen des neuen Benutzers die erforderlichen Kontoberechtigungen gewähren.
Sie können den Benutzernamen und das Passwort für mehrere Prozessorkonfigurationen auf der Plattform verwenden. Ihre Zugangsdaten werden sicher und verschlüsselt in unserer zertifizierten Plattform gespeichert.
Erstellen oder bearbeiten Sie eine Prozessorkonfiguration unter Space > Zahlung > Konfiguration > Verarbeiter. Um den Verarbeiter korrekt einzurichten, führen Sie die folgenden Schritte aus:
-
Geben Sie zunächst den Vendor Name ein, der in der ersten E-Mail von Sage Pay bereitgestellt wurde.
-
Wählen Sie den korrekten Operation Mode für Test- oder Live-Transaktionen
-
Geben Sie den oben erstellten Benutzernamen und das Passwort ein und speichern Sie die Konfiguration.
-
Klicken Sie auf view, um die Konfiguration des Verarbeiters anzuzeigen, und klicken Sie oben auf die Schaltfläche CONFIGURE IP ADDRESSES. Dies führt zu einer automatischen Konfiguration Ihres Sage Pay-Kontos. Bitte beachten Sie, dass Sie dies erneut tun müssen, wenn Sie in den Live-Modus wechseln. Es kann auch vorkommen, dass Sie aufgrund von IPs einen Fehler wegen eingeschränktem Zugriff erhalten. In diesem Fall müssen Sie diese Konfiguration wiederholen.
Sie haben die Prozessorkonfiguration für Sage Pay erfolgreich abgeschlossen.
Sie sollten die 3-D-Secure-Einstellungen auf dem Standard belassen und 3-D Secure aktiviert lassen.
In Ihrem Sage Pay-Konto haben Sie die Möglichkeit, spezifische 3-D-Secure-Bedingungen zu definieren. Wir empfehlen, diese Funktion zu deaktivieren, da sie aufgrund von Konflikten mit Bedingungen, die Sie möglicherweise in der Plattform eingerichtet haben, zu unerklärlichem Verhalten führen kann.