Um mit der Zahlungsabwicklung über Concardis (ConCardis PayEngine DirectLink) zu beginnen, müssen Sie zunächst ein Händlerkonto erhalten. Dadurch erhalten Sie eine PSPID und ein Passwort.
Der Concardis (ConCardis PayEngine DirectLink) Direct Link-Prozessor wird benötigt, wenn Sie nicht möchten, dass Ihr Kunde auf die Zahlungsseiten von Concardis (ConCardis PayEngine DirectLink) weitergeleitet wird. Falls die Option DirectLink in Ihrem Händlerkonto aktiviert ist, können Sie die meisten Zahlarten Onsite verarbeiten. Dadurch können Sie die Zahlungsseite vollständig innerhalb der Anwendung gestalten, und Sie haben auch die Möglichkeit, die Betrugseinstellungen in der Anwendung zu verwenden.
Darüber hinaus wird DirectLink auch benötigt, wenn Sie die Transaktionsverwaltungsvorgänge direkt in der Anwendung durchführen möchten. Falls die Option DirectLink(maintenance) in Ihrer PSPID aktiv ist, können Sie Gutschriften und Verbuchungen (complete) direkt innerhalb der Anwendung durchführen.
In der folgenden Dokumentation finden Sie einen Überblick über die Konfiguration des Concardis (ConCardis PayEngine DirectLink)-Verarbeiters. Folgen Sie der Anleitung Schritt für Schritt, um Ihr Konto einzurichten. Falls eine Einstellung nicht ausdrücklich erwähnt wird, belassen Sie sie unverändert, sie hat keine Auswirkung auf die Konfiguration.
Zunächst müssen Sie in der Anwendung eine Prozessorkonfiguration erstellen. Gehen Sie zu Space > Zahlung > Konfiguration > Verarbeiter, um einen neuen Verarbeiter zu erstellen. Falls Concardis (ConCardis PayEngine DirectLink) nicht in der Liste sichtbar ist, beginnen Sie, den Namen einzugeben, und er sollte erscheinen. Klicken Sie auf Weiter, um die Konfiguration zu starten.
Als Nächstes müssen Sie eine PSPID, einen Hash-Algorithmus sowie eine SHA-IN- und SHA-OUT-Passphrase festlegen. Wir empfehlen, unterschiedliche SHA-IN- und SHA-OUT-Phrasen zu verwenden und SHA-512 als Hash-Algorithmus zu verwenden.
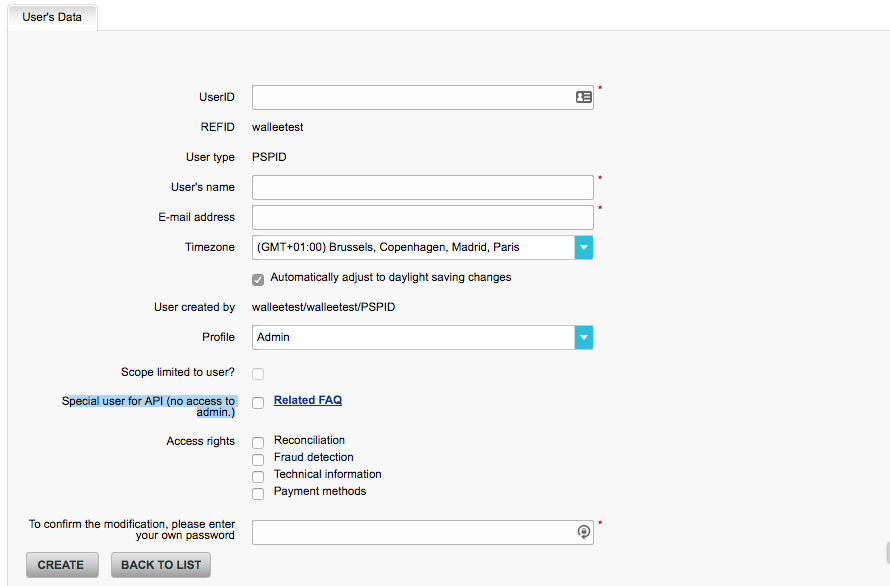
Um den Concardis (ConCardis PayEngine DirectLink)-DirectLink-Verarbeiter zu verwenden, müssen Sie im Backend von Concardis (ConCardis PayEngine DirectLink) eine API User ID und ein User Password erstellen.
Navigieren Sie zu Configuration > Users und klicken Sie auf new user, um einen API-Benutzer zu erstellen. In diesem Bildschirm können Sie eine USERID, einen Benutzernamen usw. erstellen.
Für das Profil empfehlen wir, das Profil Admin without user management auszuwählen.
Stellen Sie sicher, dass Sie das Kästchen Special user for API (no access to admin.) aktivieren. Falls dieses Kästchen nicht sichtbar ist, müssen Sie Concardis (ConCardis PayEngine DirectLink) kontaktieren und sicherstellen, dass die DirectLink-Option in Ihrem Konto aktiv ist.
Figure 1. Einen API-Benutzer erstellen
Navigieren Sie nun zum Backend von Concardis (ConCardis PayEngine DirectLink). Melden Sie sich mit Ihrer PSPID und Ihrem Passwort an und navigieren Sie zu Configuration > Technical Information.
Der nächste Abschnitt trägt den Namen der Konfigurations-Tabs und teilt Ihnen für jeden Konfigurations-Tab mit, was eingestellt werden muss.
Dieser Tab kann ignoriert werden. Er ist nur eine Übersicht über Ihre Einstellungen.
Die Einstellungen für die globalen Transaktionsparameter sind globale Einstellungen für Ihre Zahlungsverarbeitung. Normalerweise muss hier nichts geändert werden. Werfen Sie einen Blick auf den Screenshot unten, der die Standardeinstellungen zeigt.
Eine Einstellung ist entscheidend, um sicherzustellen, dass die Integration ordnungsgemäß funktioniert: Der Operation Mode muss auf Authorization gesetzt werden.
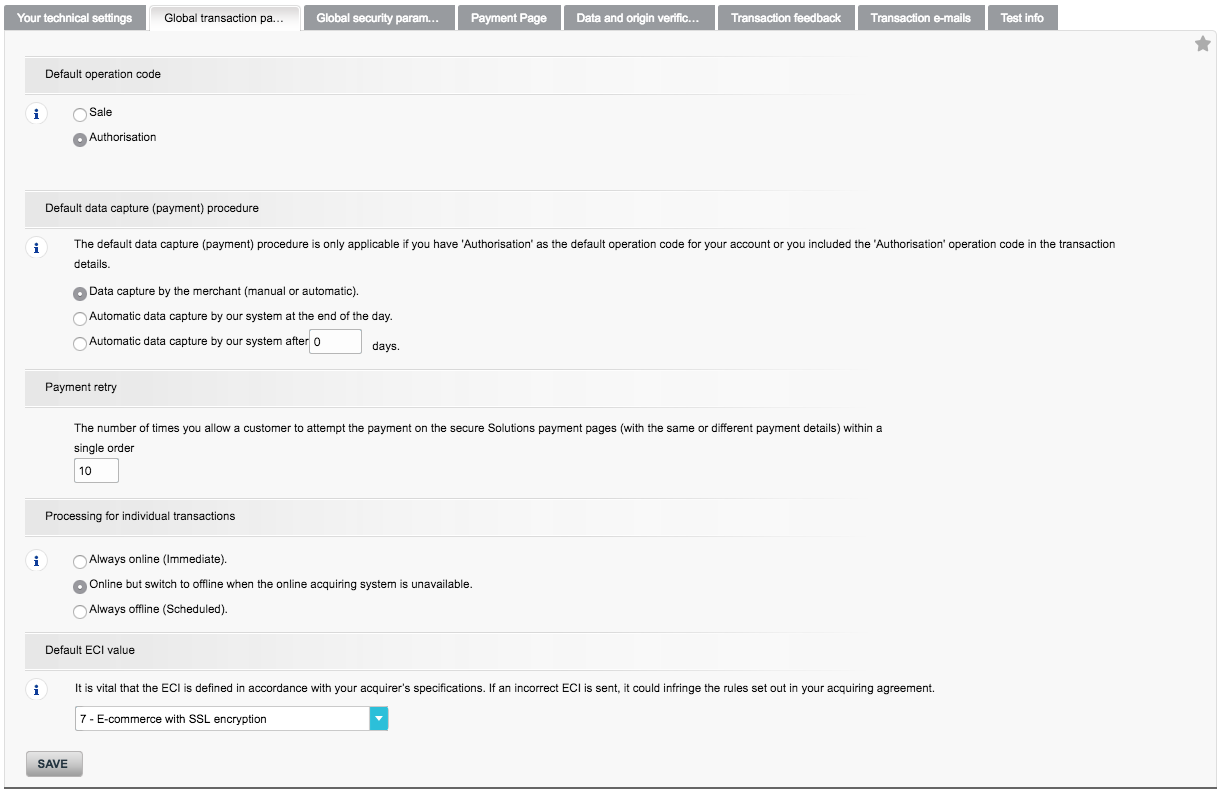
Figure 2. Einstellungen Global Transaction Parameter
In diesem Tab legen Sie den Hash-Algorithmus und die Kodierung fest. Stellen Sie sicher, dass Sie den Hash-Algorithmus identisch (wir empfehlen, ihn auf SHA-512 zu setzen) zu Ihren Verarbeiter-Einstellungen setzen und die Kodierung auf UTF-8.
Dieser Tab legt die Sicherheit für den Aufruf der Zahlungsseite von Concardis (ConCardis PayEngine DirectLink) fest. Auch hier müssen Sie sicherstellen, dass Sie die SHA-IN-Passphrase identisch zu Ihren Verarbeiter- Einstellungen in der Anwendung setzen.
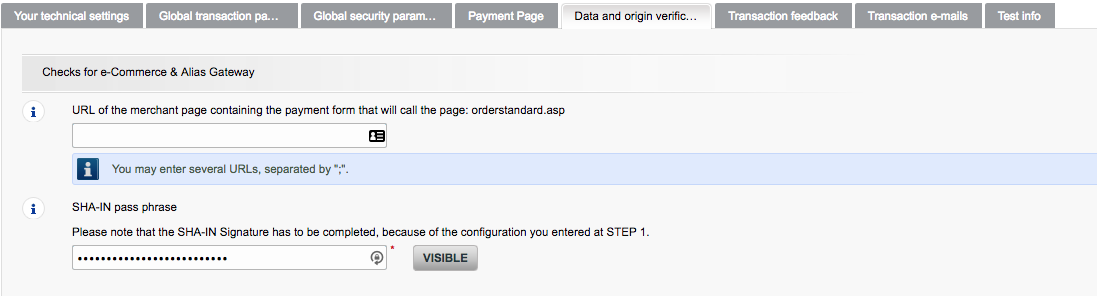
Figure 4. Data and origin verification für Concardis (ConCardis PayEngine DirectLink) e-Commerce & Alias Gateway.
Stellen Sie sicher, dass Sie in der nächsten Einstellung Checks for DirectLink and Batch (Automatic) dieselbe SHA-IN-Signatur wie in der Anwendung setzen, und stellen Sie sicher, dass im Feld darüber keine IP-Adresse eingetragen ist.
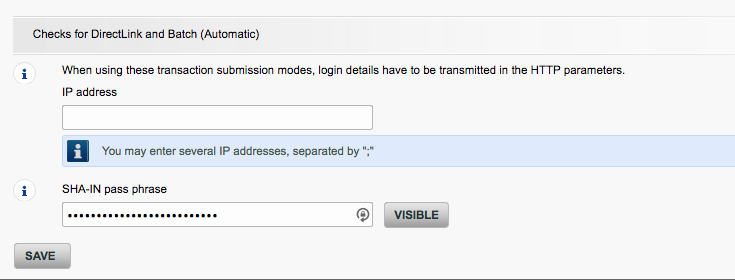
Figure 5. Checks for DirectLink and Batch (Automatic)
Dieser Tab enthält die Einstellungen für das Transaktions-Feedback erfolgreicher oder fehlgeschlagener Transaktionen an die Plattform:
-
Lassen Sie das Feld HTTP redirection in the browser URLs leer.
-
Stellen Sie sicher, dass Sie die Einstellung I would like to receive transaction feedback parameters on the redirection URLs. aktivieren.
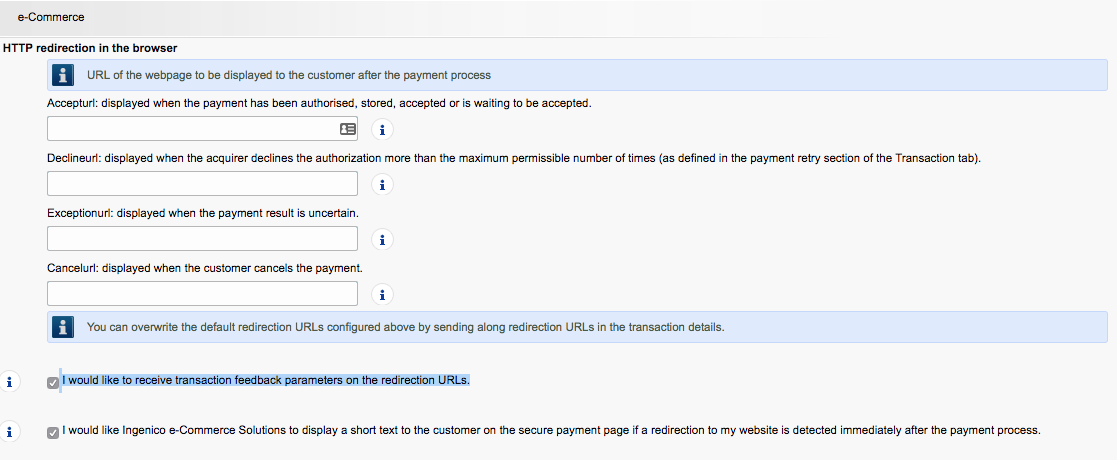
Figure 6. HTTP-Redirection-Einstellungen im Browser. Stellen Sie sicher, dass Sie die Kästchen aktivieren.
Für die direkte HTTP-Server-to-Server-Anfrage setzen Sie die Einstellung auf Always online (immediately after the payment to allow customization of the response seen by the customer). oder, falls diese Einstellung nicht verfügbar ist, setzen Sie sie auf Online but switch to a deferred request when the online requests fail.
Im Feld URL of the merchant post-payment page geben Sie die folgende URL ein:
https://app-wallee.com/payment/concardis/notify
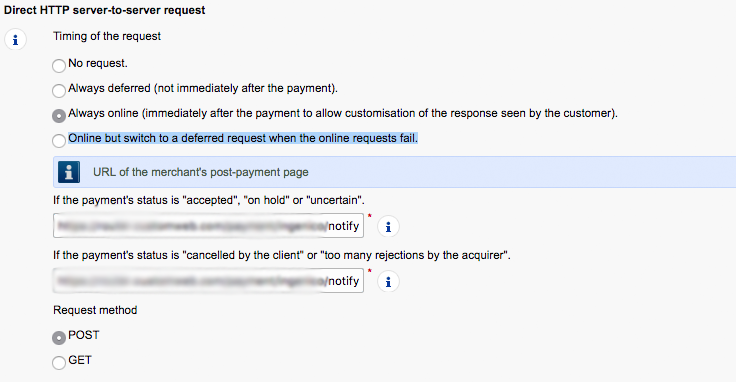
Figure 7. HTTP-Server-to-Server-Anfrageeinstellungen. Es kann sein, dass die hier gezeigten Felder leicht von Ihrem Konto abweichen.
Die dynamischen E-Commerce-Parameter können alle auf die selected side verschoben werden. Und stellen Sie sicher, dass Sie die SHA-OUT-Signatur genau wie in der Anwendung setzen.
Wählen Sie für die HTTP request for status changes die Option For each offline status change (payment, cancellation, etc.). und geben Sie im Eingabefeld darunter die folgende URL ein:
https://app-wallee.com/payment/concardis/notify
Stellen Sie außerdem sicher, dass in den Dynamic parameters für Directlink alle Parameter von Available nach selected verschoben werden.
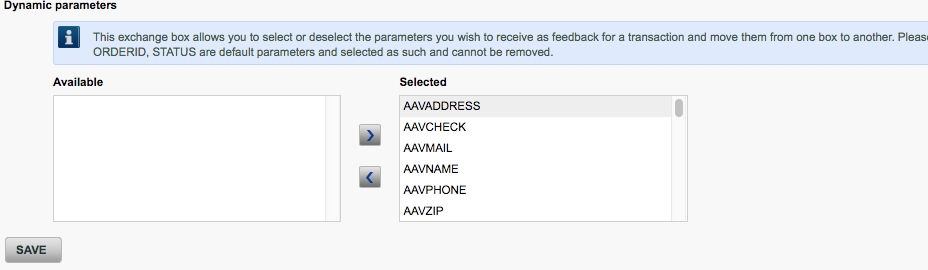
Figure 8. Dynamic Parameters für Direct Link.
Falls Sie eine E-Mail für die verarbeitete Transaktion erhalten möchten, können Sie hier Ihre E-Mail-Adresse festlegen und Sie werden benachrichtigt, sobald Sie eine Zahlung erhalten.
Sobald alles im Backend von Concardis (ConCardis PayEngine DirectLink) konfiguriert ist, können Sie fortfahren, die Zahlarten zu erstellen (falls Sie dies noch nicht getan haben) unter Space > Zahlung > Konfiguration > Zahlart.
Nachdem die Zahlart erstellt wurde, können Sie die Prozessorkonfiguration und die Zahlart in der Connector-Konfiguration verbinden Space > Zahlung > Konfiguration > Connector.