PLEASE NOTE: To integrate Wallee Group AG into your Shopify, a few more steps are required instead of just one click. Please follow this step-by-step documentation on how to successfully integrate to your Shopify shop.
Shopify is a Canadian e-commerce company headquartered in Ottawa, Ontario, that develops computer software for online stores and retail point-of-sale systems. We built an integration into Shopify’s Payment gateway that allows you process transactions in your preferred payment method in your Shopify store. Please follow the detailed steps on how to integrate Wallee Group AG payments into your Shopify backend.
Please follow the steps outlined below.
It is possible that the Shopify menu is not available within your Wallee Group AG space. In this case, please navigate to the Features menu, where the features can be found listed, and activate the Shopify feature Space > Features. Move the slider to activate the feature. Click configure to configure your myshopify shop.
Either you have come from clicking the configure button from the previous step or you will need to navigate to Space > Shopify and create your integration. Make sure the name you set is the name used in the Shopify admin URL: [shopName].myshopify.com.
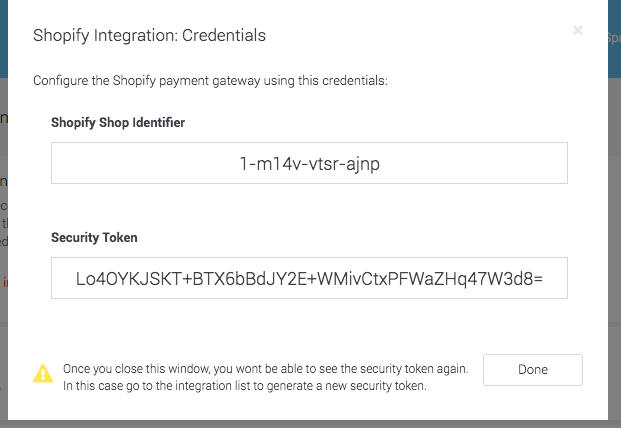
In the Setup Assistant, as a next step you are presented with the Shopify credentials. Please store these details, as they are only shown once. You will need them to be able to configure the individual gateways in your Shopify backend. Alternatively, open a new window in order to continue with the following steps, keeping the window with the credentials open for reference.
Figure 1. Your Shopify credentials will be displayed only once! Please store them in order to be able to configure your gateways in Shopify.
In case you have to generate new credentials for your already existing integration, please navigate to Space > Shopify where you will find an overview of active Shopify integrations. Click on the Shopify shop you wish to generate a new token for, under the Credentials section, click on the Generate New Token button to create new credentials.
|
Note
|
You can only have three active tokens. You will be prompted to delete one token, should you wish to generate a fourth token. |
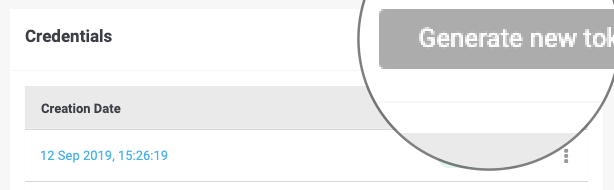
Figure 2. Add the gateway to your Shopify Store
Click on the Install Shopify App button in your Shopify integration we just created. This will forward you to your Shopify backend where you are prompted to install Wallee Group AG as a sales channel, following a reroute back to Wallee Group AG after you have granted the permission in your Shopify backend. Now you are able to use the integration.
The Shopify App makes sure that the transaction state in your store and in Wallee Group AG are in sync and that the line items are transmitted.
This step is very important! Whether you connect your store using the Setup Assistant or manually, you will need to install the different payment gateways of the payment methods you wish to offer in your Shopify store. Shopify only accepts a few pre-installed gateways for each country. In order for you to be able to process your desired brand, you will need to install the different payment methods.
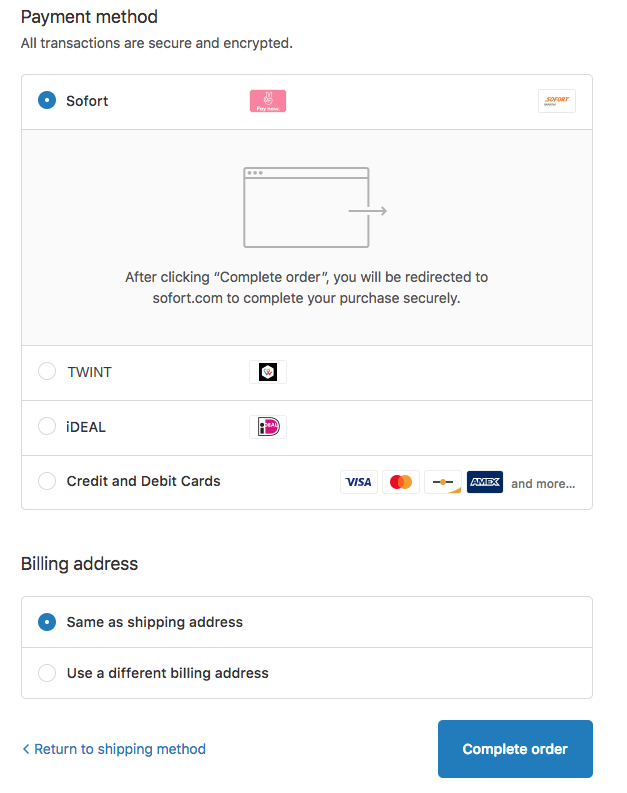
Figure 3. This screenshot shows the payment pre-selection where the payment methods are shown individually in your checkout.
In the connectors menu under Payment>Configuration, you will find your payment methods you would need to add as a gateway. Navigate to your Shopify integration, under the section Payment Gateway you can click on Install Gateways. For your comfort, we have also listed them below. The link takes you you to the login page of Shopify, where you can then install the payment gateway in your admin panel.
|
Note
|
Replace the shop_domain with the store domain, where 1052994 is the gateway ID for that particular gateway.
https://admin.shopify.com/store/shop_domain/settings/payments/alternative-providers/1052994
|
Clicking the link will prompt you to login to your store where you will asked if you want to add the payment method in your store. Click the add button in order to proceed. Take note of the name of gateway you are installing, as this will be the one who will need to configure in your Shopify backend.
Once the Gateway has been confirmed it is visible in your Shopify Store Settings > Payment providers in the section Third-party providers or Alternative payment methods.
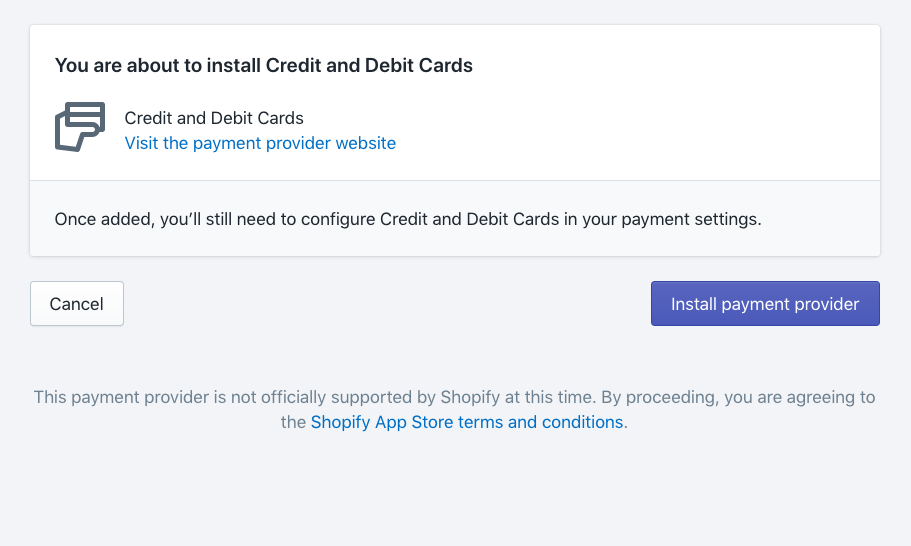
Figure 4. Add the gateway to your Shopify Store. Take note of the name of the gateway you are installing so that you can configure the correct one later.
Adding the payment method individually to your Shopify store will result in the display of the payment type in the pre-selection in your checkout. Please note, the order of the gateways displayed in your checkout can not be influenced.
You can find your installed gateway in your Shopify store under Settings > Payment providers in the section Third-party providers or Alternative payment methods. Using the credentials you set aside earlier from your Shopify integration, copy them into the corresponding configuration fields for Shop Identifier and the Security Token for every payment method you wish to display in your checkout.
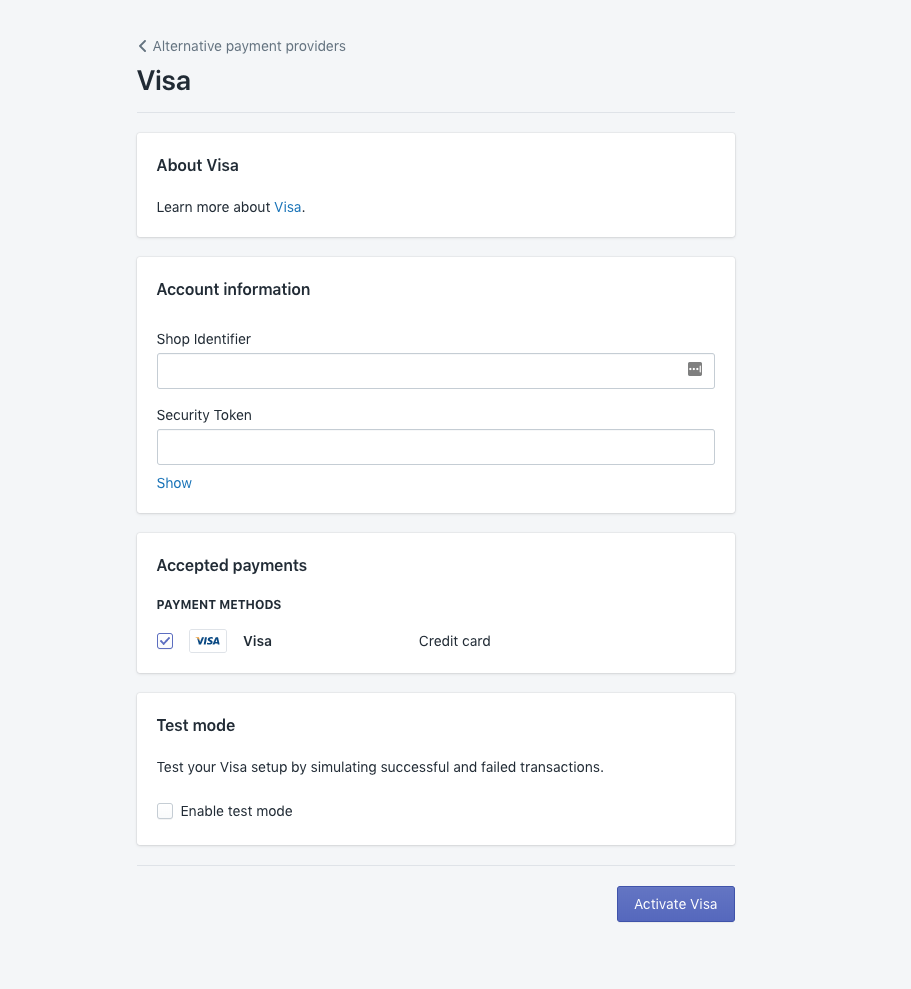
Figure 5. Select the gateway and enter the credentials from your Shopify integration into the corresponding fields.
|
Note
|
When you are ready to accept live payments in your online shop, make sure the Test Mode is unticked in each payment gateway. |
We provide two different ways how the payment processing is done:
-
With the default Integrated Payment Form, the entry of payment details happens in your checkout after the order is confirmed by your customer. There is not redirection to the payment page.
-
With the Payment Page Integration the customer is redirected after the order is confirmed to the payment page to finalize the payment.
Find out more how those two modes can be enabled:
The default integration is the integrated payment form, where the customer will enter the credit card details in a form that is in your Shopify checkout. This allows best in class user experience.
|
Note
|
For this to work you have to make sure that the app proxy path /apps/checkout/ is not taken by another app. Otherwise, please disable the other plugin. Do not hesitate to get in touch with us should the problem persist. |
The integrated payment form will be embedded in the payment form directly in your Shopify checkout.
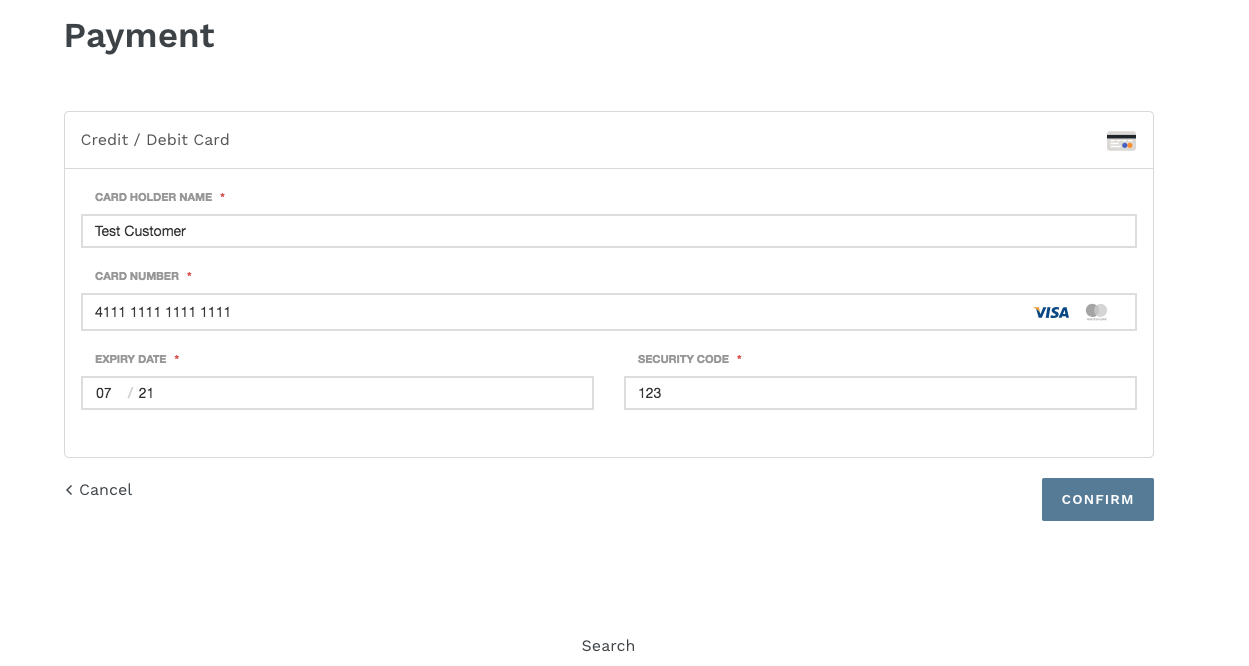
Figure 6. The integrated payment, as seen above, will display in the payment form directly in your Shopify Checkout.
Should this feature not be the default feature, you can activate this in your integration page in Wallee Group AG by simply clicking on the slider to activate the embedded payment form: /space/select?target=/integration/shopify/list[Space > Shopify].
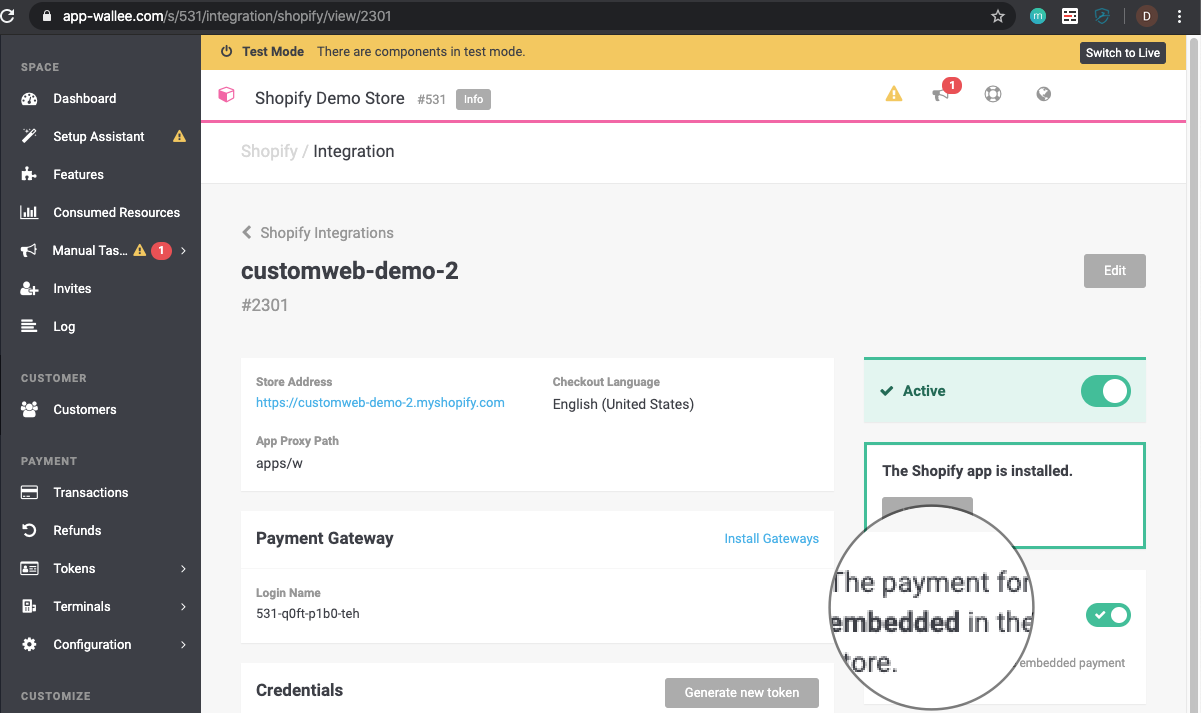
Figure 7. The integrated payment form will display the payment form directly in your Shopify Checkout.
If you are using CloudFlare in your store:
To load the integrated payment form in Shopify, we use a so called App Proxy, which means that Shopify connects to our server and where we then return the payment form. For this we use CloudFlare in the background. If you are also using CloudFlare in your store, CloudFlare believes that the traffic is routed twice by CloudFlare, which is not allowed and will lead to issues.
To solve the issue you can apply one of the following solutions:
-
Disable CloudFlare for your Shopify shop.
-
Disable the 'Integrated Payment Form' in the Shopify integration in your Wallee Group AG space.
-
Disable URL redirects in Shopify. URL redirects are used to redirect traffic from one web page to another. This can be done under the domain settings within your Shopify store.
In order to accept payments over the configured gateway, you have to make sure that you configured your processor, payment method and connector correctly. Manuals on how the payment processor needs to be configured can be found on the Processor List.
The Payment Process is completely standardized for every payment method you can process. This gives you the ability to simply add a payment method or processor without changes inside of your Shopify configuration. An overview about the states and the payment processes can be found in the Payment Documentation.
In the following section we provide you an overview about how the transaction states are mapped into the Shopify state graph for orders.

You can capture, cancel and refund transactions directly from within the Shopify backend. Please note if you refund, void or capture transactions within Wallee Group AG, the events will NOT be synchronized into Shopify.
You have the possibility for your transactions to have the payment only authorized after the order is placed. Inside the connector configuration you have the option, if the payment method supports it, to define whether the payment should be completed immediately or deferred.
To complete a transaction in Shopify, open the order and click on the Capture Payment button.
This will finalize the order and it can no longer be changed.
|
Note
|
When the completion is pending in Wallee Group AG, the order will stay in the authorized state in Shopify. |

Figure 9. Capture a Transaction.
Deferred Payment Completion
Some retailers only want to authorize transactions and start the fulfillment process once all items are shippable.
This is possible, however, certain processes should be followed. If you have configured payment completion to be deferred, you should capture the transaction before you initiate the shipment,
as it can happen that a completion fails. If you want to be sure that you do not ship items for which you have not been paid for, you should postpone the shipment until
the fulfill state is reached. The transaction will move into the Authorized state in Wallee Group AG and in Shopify after creation. If you want to start the fulfillment process, make sure you initiate the completion process as described above. Once the completion is successful, the order will switch to the Fulfill state in Wallee Group AG and to the Paid state in Shopify. You can now start the fulfillment process.
In order to void a transaction, click on the More actions button and then on the Cancel order button.
|
Note
|
You can only void transactions that are not yet completed. |
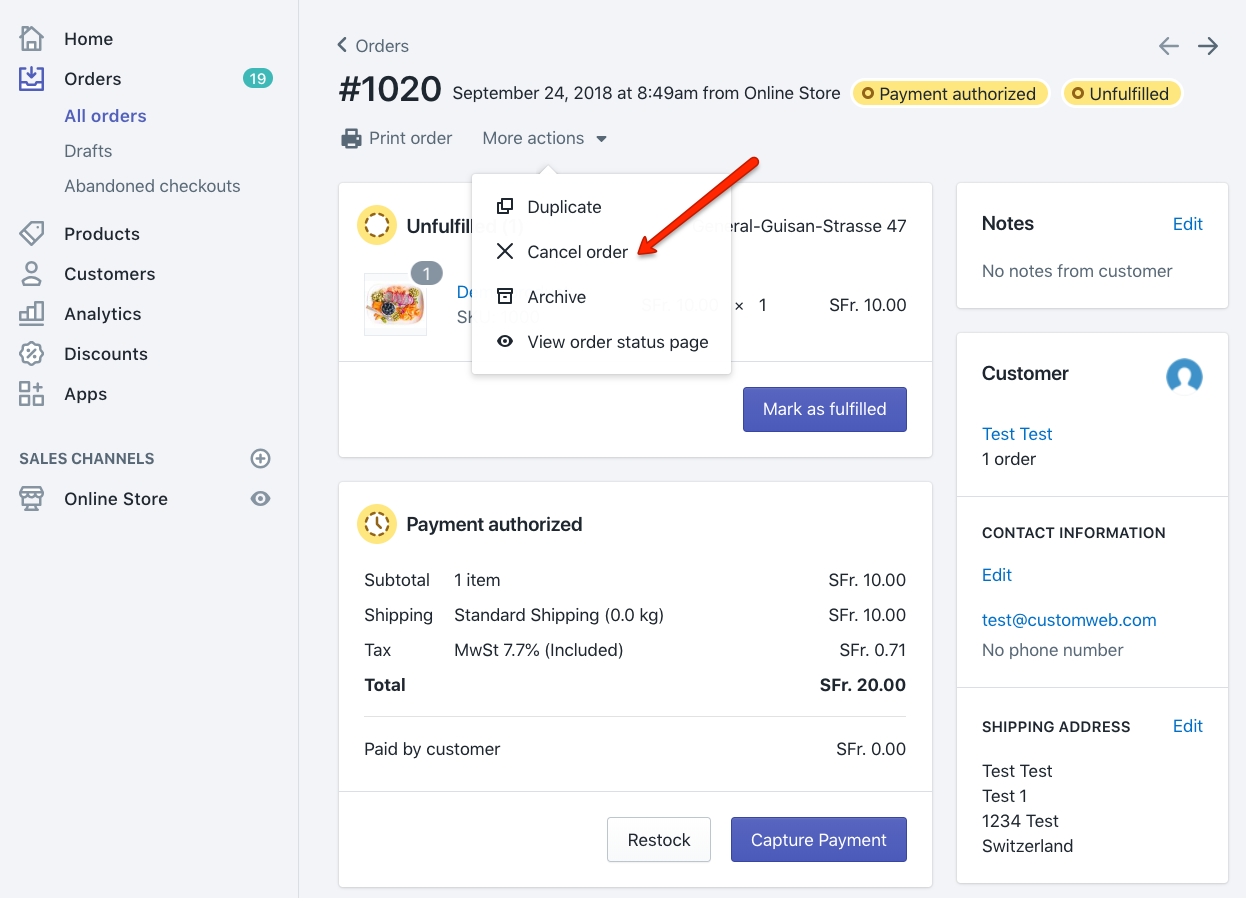
Figure 10. Void a Transaction.
You have the possibility to refund already completed transactions. In order to do so, open the captured order. By clicking on Refund the window for refunds will show.
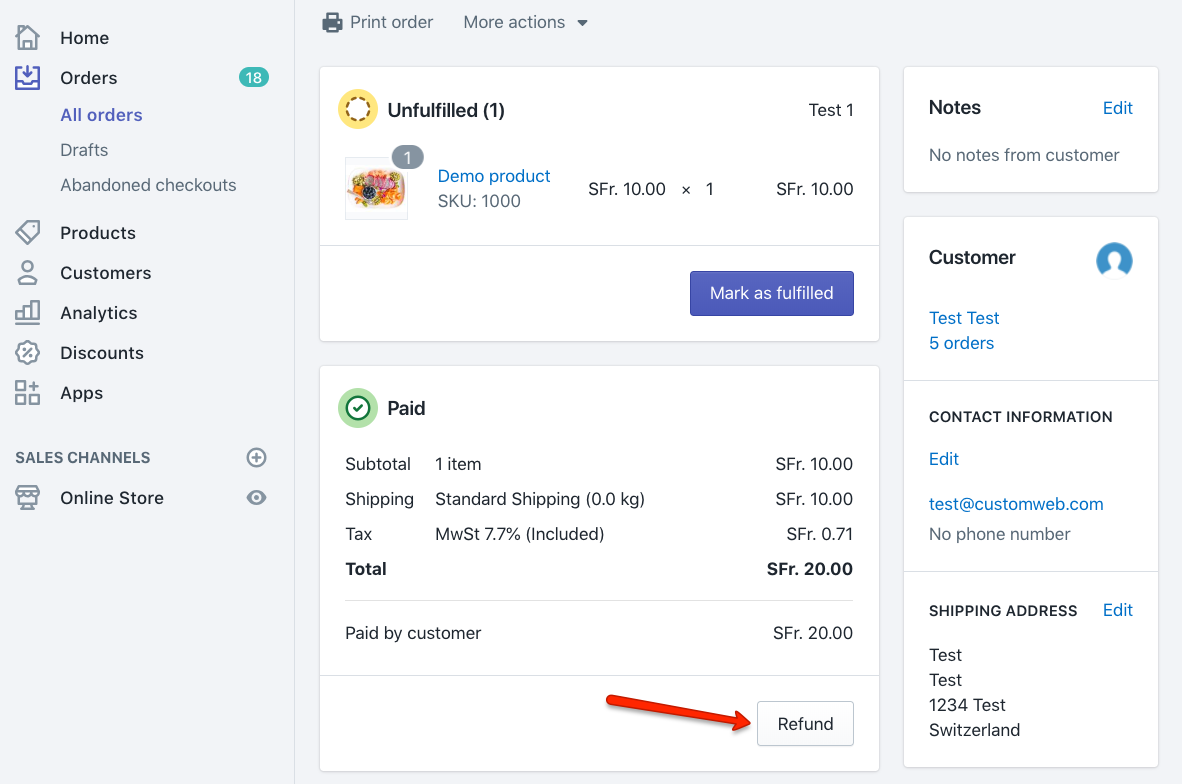
Figure 11. Refund a Transaction.
|
Note
|
Ensure yourself that the connector which processed this payment supports the refund feature. In order to check that have a look at the processor list and check the connector of a processor. |
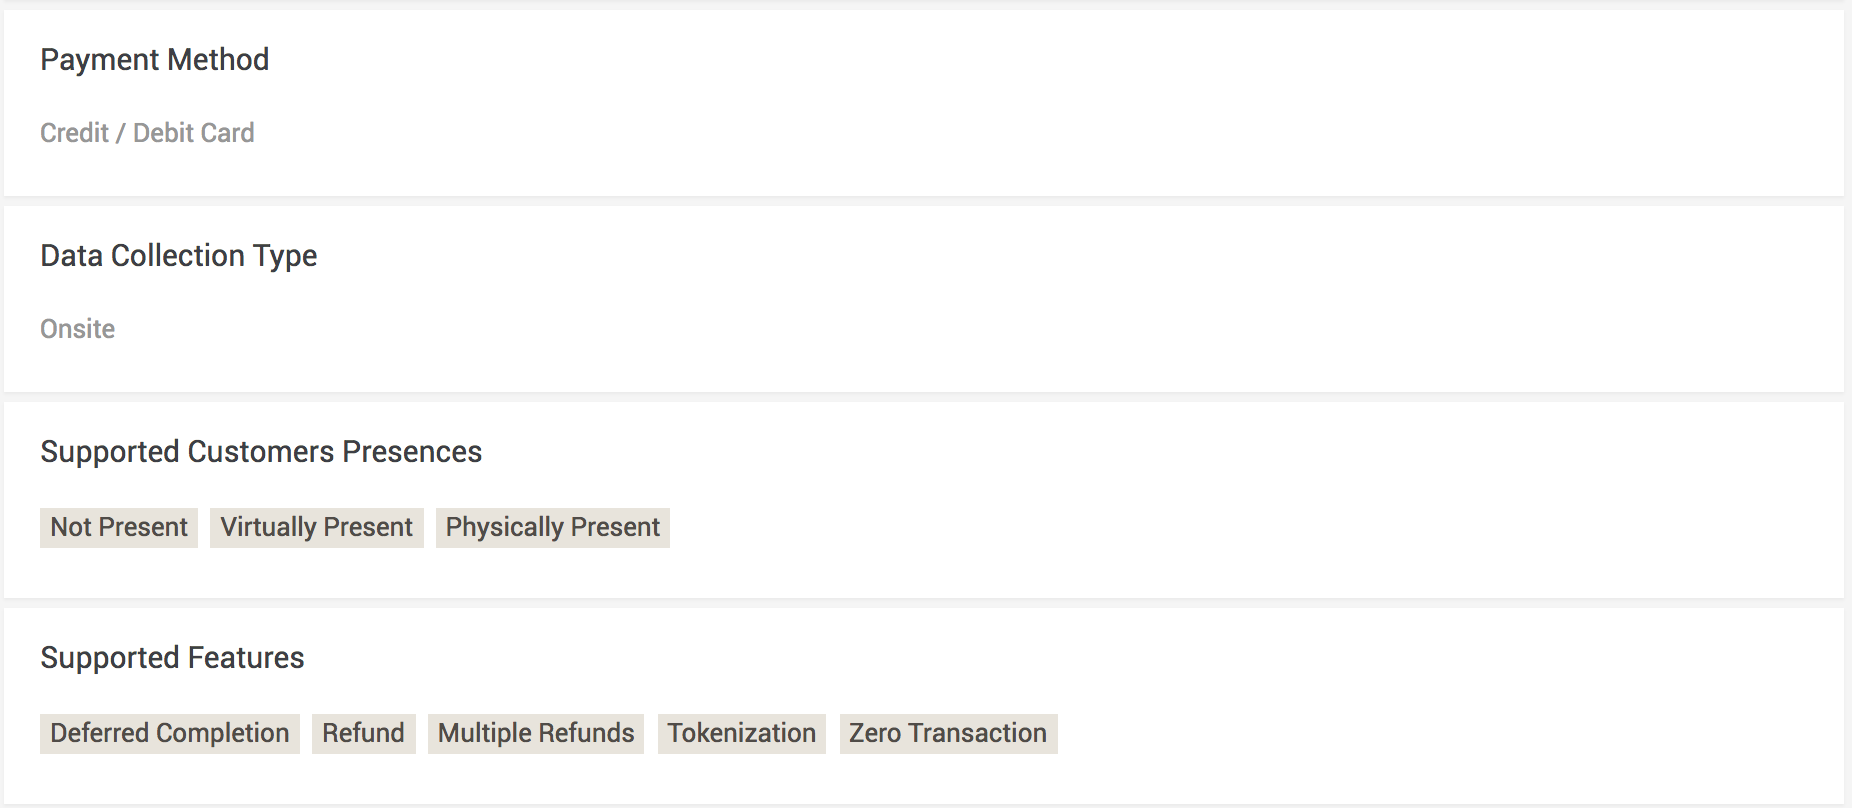
Figure 12. See the example of an AMEX connector that supports Refunds.
You can make refunds based on product quantity. In order to do so, enter the number of products you wish to refund to your customer.
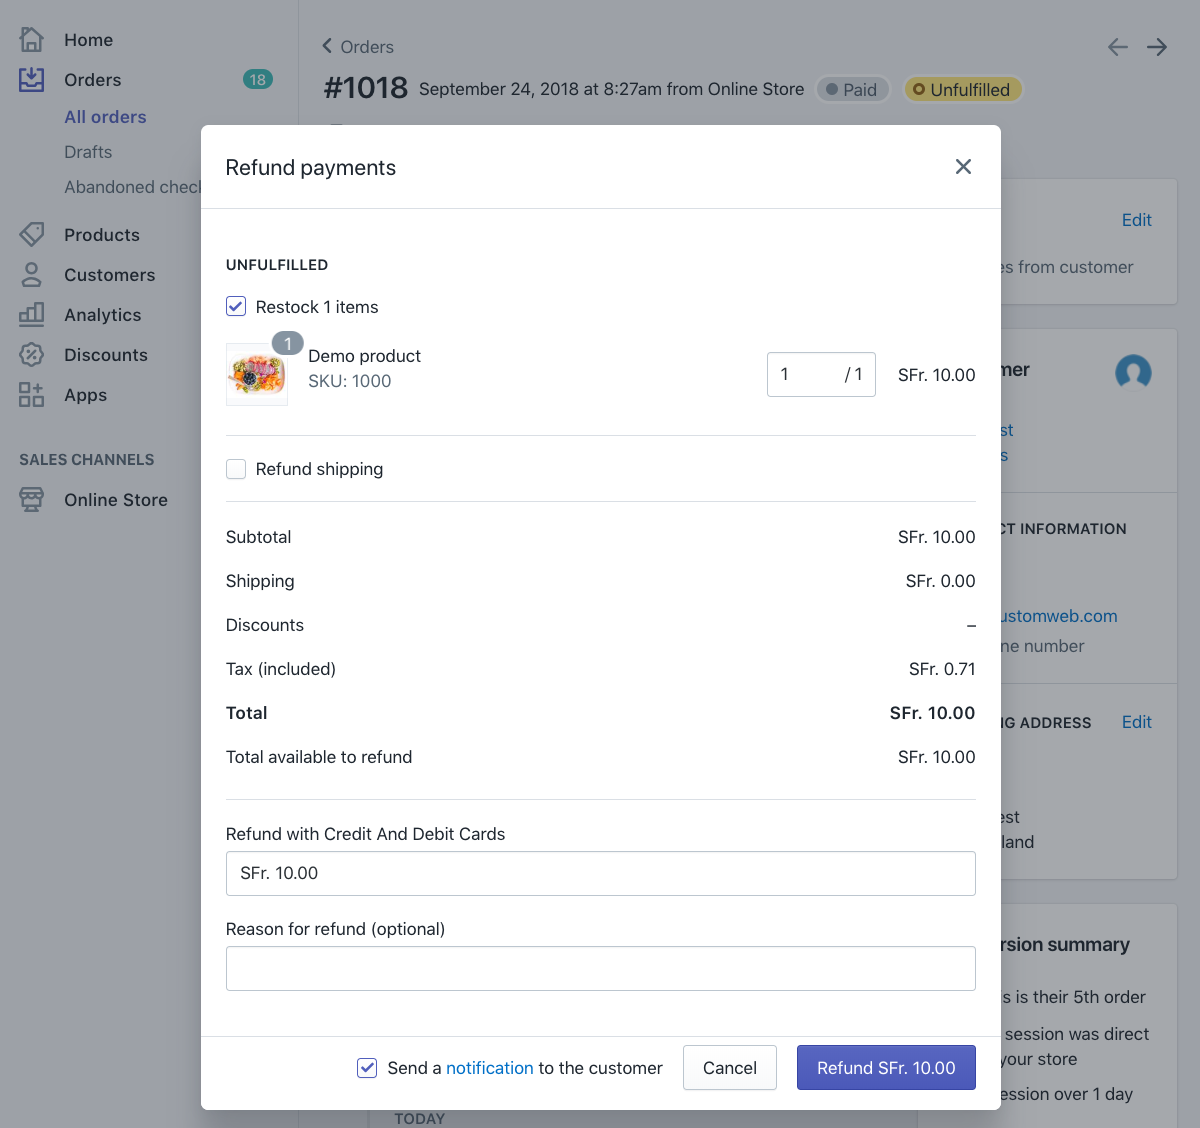
Figure 13. Refund a Transaction.
You can carry out as many individual refunds as you wish until you have reached the quantity of the original order.
|
Note
|
It can take some time until you see the refund in Shopify. Refunds will only be visible once they have been processed successfully by your processor, and if refunds are supported by that processor. |
If a delivery has not been done, the state of the order will be in Authorized. This happens when the transaction has not reached the fulfill state in Wallee Group AG yet.
There are essentially two reasons why this can happen:
-
The transaction is not completed. If this the case, you would have to complete the transaction as described above.
-
We are unable to tell you if you can fulfill the order. The delivery decision is usually made automatically. If this does not happen within the defined time frame, we will generate a manual task which you should observe and follow the instructions.
You can find more information about manual tasks in our Manual Task Documentation.
Matching your Shopify orders with the payments in your processors is not so straight forward and requires more attention.
The main problem is that by the time we have to create the transaction at the processor, Wallee Group AG does not have the
Shopify Transaction and Order Name to give as a reference. This is why we have to transmit the Checkout ID.
You are able to match the transactions via the Shopify Transaction List in your space.
The list provides you with the mapping of Checkout ID which equals the merchantReference in your processor and the OrderName which is visible in your Shopify store.
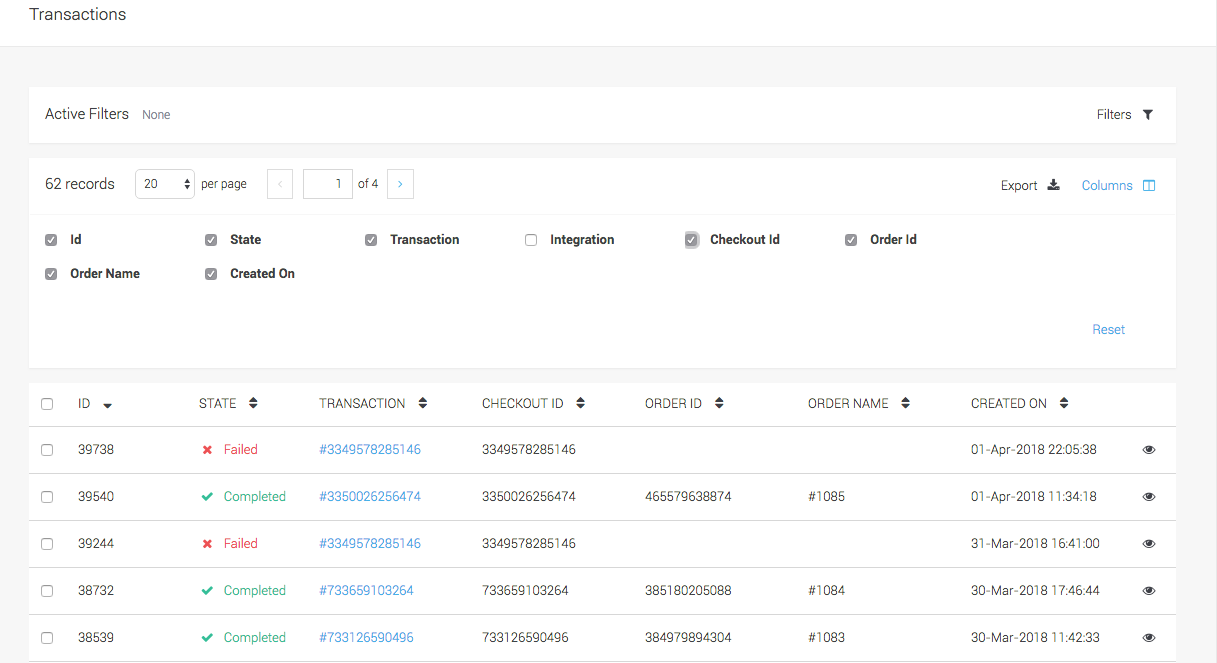
Figure 14. The Shopify transaction table provides you the mapping for the orderName and checkoutId.
|
Note
|
It is necessary that you install our app to have these details. You can also export this list by clicking on the export icon at the top of the table. |
The application supports the option to securely store the payment information of your customer. This will increase your conversion for customers re-visiting your store as they do not have to re-enter their payment information.
In order to create a token you will have to configure your payment method as described in the Tokenization Documentation.
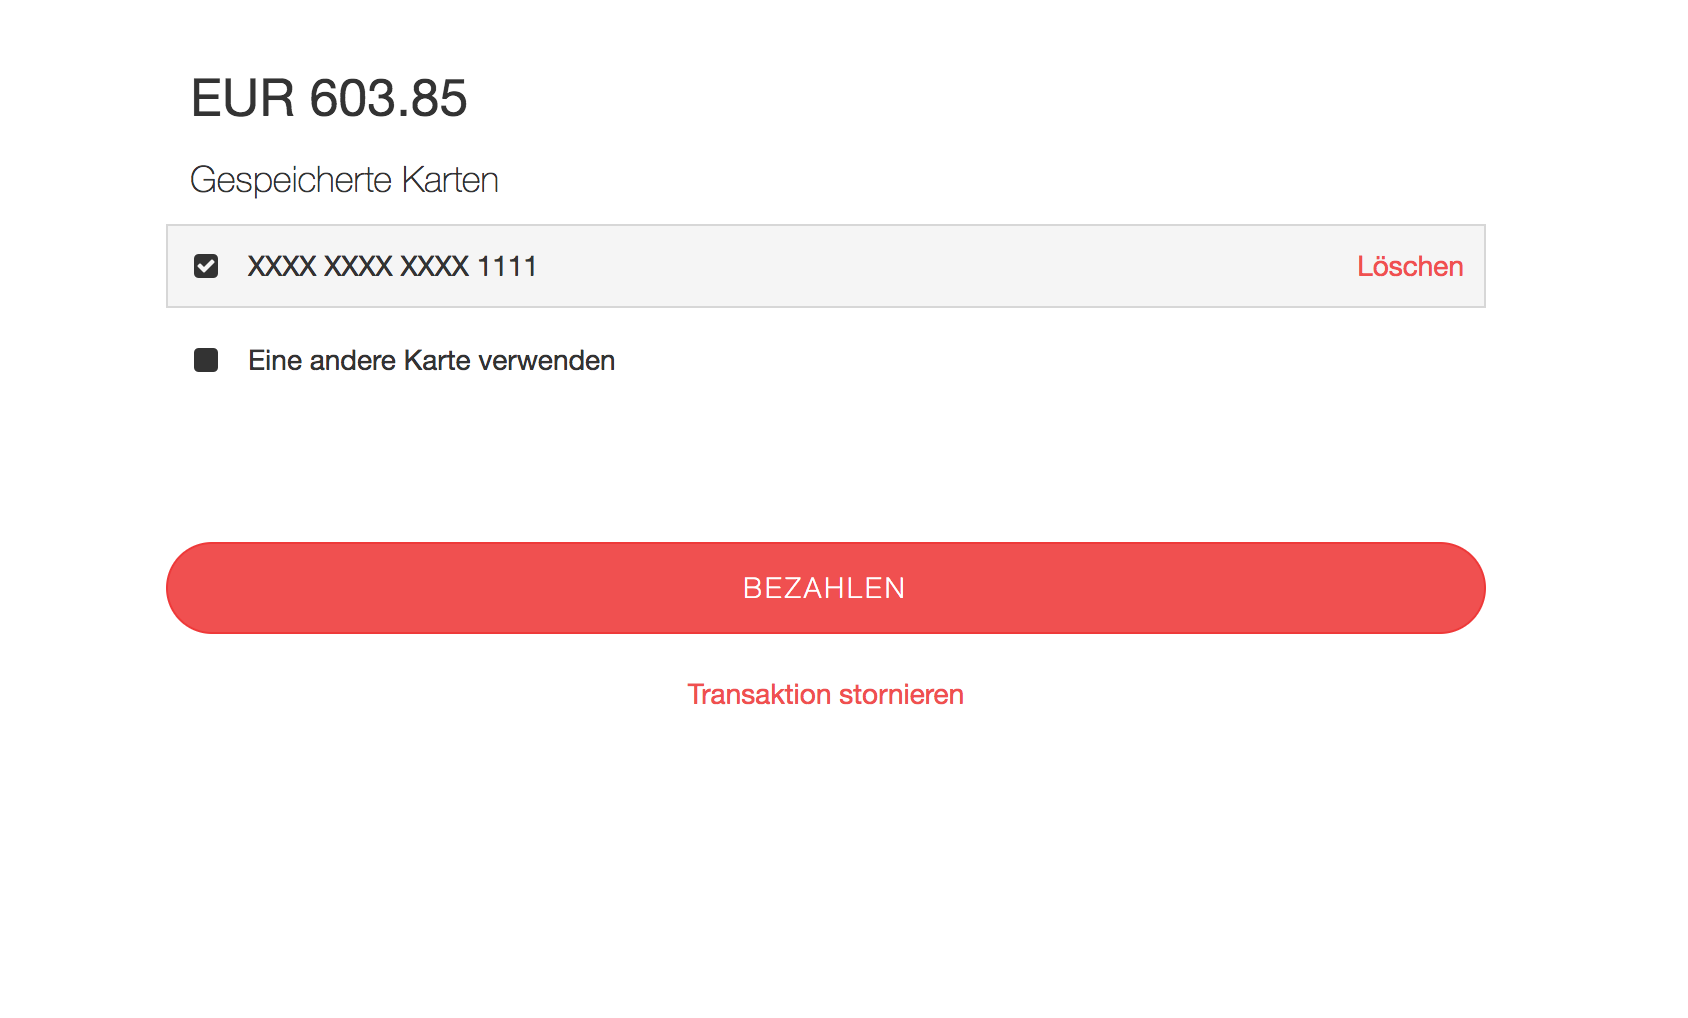
Figure 15. Let your customers choose from a previously stored token.
As the token is tied to a customerId, the stored token will only be visible for the merchant who has created an account in your Shopify store. This is why you will have to make sure that the creation of accounts is enabled. If you want to make sure that the customer token will be displayed, we even suggest to enforce the account creation in Shopify.
Navigate in your Shopfiy backend to Settings > Checkout and set the account selection to Accounts are required or Accounts are optional.
Shopify Plus allows to ask the customers for further information during the checkout by adding additional form fields. The entered values can be stored on the order as order attributes.
By using specific keys, it is possible to ask for certain information already in the checkout instead of the payment form.
Supported information:
-
dateOfBirth: The customer’s date of birth to put on the transaction’s billing address. -
salutation: The customer’s salutation to put on the transaction’s billing address. -
commercialRegisterNumber: The customer’s organization’s commercial register number to put on the transaction’s billing address. -
salesTaxNumber: The customer’s organization’s sales tax number to put on the transaction’s billing address. -
socialSecurityNumber: The customer’s social security number to put on the transaction’s billing address.